In understanding how to build a koi pond filter, there are necessary steps to follow. Although this is typically a very simple project to undertake, you have to be sure that the hour’s work should not give you any problems whatsoever in the end.
Learn Your Project
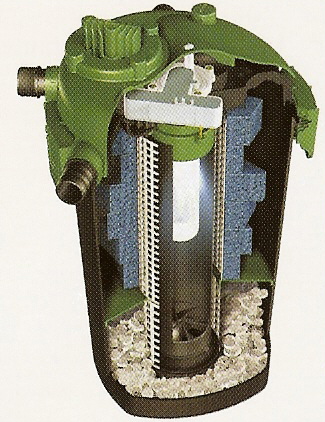
Learning how to build a koi pond filter may merely involve a particular type of filter or two. Sometimes, it may be necessary to include both of the types. Those two types of filter are both mechanical. One of which is referred to as a bio filter.
Get Your Supplies Ready
For this project, you would need a number of crucial materials. These include a small plastic storage container that should have a firm lid, a brick, a mesh laundry bag, a drill, a small pump hose that can be submersed, and a length of hose that should be bigger than the pump hose.
You should also not forget to include a sponger and some scrubbers and about a layer of some hardware wire. Just be sure that the layer of wire would be able to fit inside the container you would use for storage. If not, do the necessary cutting to make it fit before proceeding to the first part of doing this project.
Drill Some Holes
After gathering the supplies, it’s time to do some drilling work. Get your storage container and drill. Use your drill to punch two holes in the container. Those two holes (one lower, and one smaller) should fit the hose you will put in. The lower hole would serve as a draining hole. The smaller hole would serve as the place where you fit in the hose and push it through. Water would first pass through that smaller hole via the pump.
Put in the Brick
At the bottom of the storage container, place a brick. The brick has two valuable purposes. It acts as a place where gunk will be collected, and also serves as a sturdy shelf.
Place Your Hardware Wire
The next thing to do is to get the wire. Place this on the brick. This will help your sponge filter to be sturdy and stable.
Fill Your Mesh Laundry Bag
Fill up the bag with a number of sponges and scrubbers. If there are some sponges that will not be able to fit in the bag anymore, just put them on the wire mesh.
To make your filter have a heater or cooler, cut a few sponges into squares. Put these inside the storage container.
Test Your Work
If you have done your project of how to build a koi pond filter perfectly, the final test of your work would go on smoothly. So check it out by plugging your pump, and get some water in your filter. A few reminders that all is well would include checking if your hose is resting below the container, and a low setting is initially followed while you’re testing your project. These could let you see how fast the water flow and water circulation is so you can make some adjustments if necessary.


