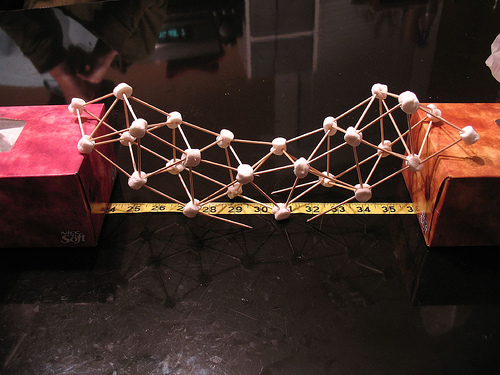
In a way, the idea of building a bridge out of toothpicks sounds kind of easy, given the construction material, and yet hard at the same time. The truth of it is that it isn’t just a matter of gluing small pieces of wood together. There is a bit of intricate planning involved to make sure every piece fits into place and the finished structure holds fast. But if one is patient enough, learning how to build a toothpick bridge can be challenging fun.
Before beginning construction of the toothpick bridge, one should first draw a layout of the bridge’s main truss on graphing paper. The squares of the graphing paper will be used in making the 45-degree angles required for the bridge’s design. In drawing out the truss, the starting and ending points of the toothpicks should be marked so that the ridge where doublers will be used can be staggered. The bridge’s overall length is open to the builder’s specification, and the elevation of the truss’ upper portion should be equal to the height of a whole toothpick. The bridge’s length may need to be modified so that the 45-degree cross-braces can begin and end to the bridge’s width.
To make the toothpick bridge’s construction much easier, its truss would have to be assembled in small parts. Begin by first working on the toothpicks for the truss’ bottom, cutting off the toothpicks’ points and making them square, then laying them out according to the line drawn on the graphing paper, and gluing them together afterwards using wood glue. The toothpicks that run down along the center must be a whole toothpick and their total number has to be an odd numeral, with the first piece starting in from either the left or the right at the center toothpicks’ measurement. Following the first toothpick, the measurement of the layout should be half of the initial measurement, and should end with the exact measurement from the beginning.
Start building the lower truss by working on the toothpicks for its top row. Make sure the toothpicks for this row will stop at the center of the upper truss’ bottom. Setting up the cross-webbing at the truss’ center may prove to be difficult, so it might help to build it over the layout on the graphing paper. As before, use wood glue to hold the pieces together. Once the glue has dried on the upper and the lower trusses, glue the 2 trusses together and put in all of the additional braces.
Following the completion of the main truss, repeat the procedure to build however many more main trusses may be needed. After finishing the side trusses, the last step will be to construct the floor and the ceiling of the toothpick bridge. These will be assembled by positioning 2 toothpicks at the sides and the centers, followed by the placement of a toothpick each for every portion of the cross-webbing. The floor should be built according to the measurements of the upper truss’ bottom, while the ceiling is built on the measurements of the truss’ top part.


