Building your computer will definitely allow you to get a custom PC that will suit your needs. Other than that, you will also save some money along the way. Customizing your computer system also gives you room for upgrade options. In the entire process, you also become more familiar with computers. Here are the things you need in order to build your own computer.
Required Materials
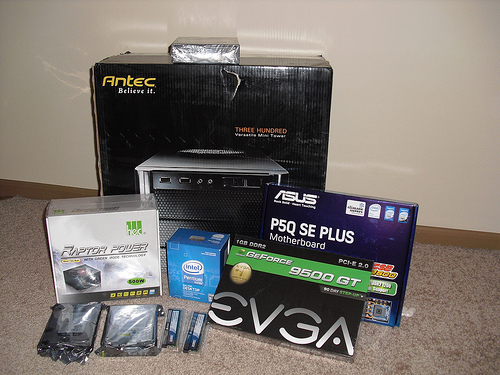
Here’s a list of equipment parts you will need to build your own computer. First off, you’ll need the following pieces of hardware: PC Case, Power Supply, Motherboard, Hard Drive, CPU, Processor Cooling Fan, Memory Modules, Video Card, Keyboard, Mouse, and Monitor. These are the primary pieces of hardware you need to have a computer system. You may add other peripherals like printers and other pieces of hardware later on after you have all these fundamental components.
Now, when you put all these pieces of hardware together, you’ll need a few basic tools. The most important one would be a Phillips cross point screw driver. A screw extractor will come in handy if you drop a screw into your computer. A flashlight will also become quite helpful to inside the computer.
Working the Case
The next step is to work on your computer case. You basically have to take the cover off using a screw driver. You only remove the case and not the front cover. With the cover off, you can now install the other parts to build your own computer.
The first part you will install is your motherboard and power supply. You should first replace the I/O shield with the one that comes with the motherboard. The motherboard is then screwed on the section of the board for it, which takes up most of the space in your case. You then screw the power supply on the section of the case designated for that part.
Make sure that the voltage on the power supply is set correctly. After that connect the power to the motherboard from the power supply leads. This will consist of the plug that either has 20 or 24 wires and the four pin plug. Connect the power for the CPU fan. You will then connect the case connectors. This will include the power switch, reset switch, the power LED, hard drive activity LED, USB ports if any, and the PC speaker. Be sure to plug the power for the tower fan if any.
Motherboard Dependent Components
The next step to build your own computer is to install the motherboard dependent components. First one to go into the board will be the CPU, its heat sink, and CPU fan. After that you should install the memory modules. The next thing to go in is the video card into its designated slot.
You then connect the hard drive and the DVD drive/optical drive. You may use either IDE or SATA connections. Make sure to plug a designated power cable to both these drives. At this point you may add other expansion cards that go into the PCI slots.
The First Run
The next step on how to build your own computer will involve making the computer run for the first time. Plug the monitor, keyboard, and mouse in their designated sections at the back. You then plug the power cord onto the power supply and plug it to your UPS, outlet, or voltage regulator plugged into the wall. You then press the power button and watch the system go. You will then install your operating system at this point.


