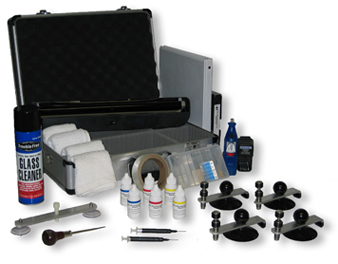
When your windshield have some stone chips and small breaks, you don’t need to totally replace it. With the help of windshield repair kits, you can do some repairs on your windshield and make it look as good as new. Here’s the method on how to use windshield repair kits to fix your damaged windshield.
Repair Method
Clean the area of the windshield that has the stone chip and use a razor blade to remove those little pieces of loose glass. You can use a glass cleaner to completely clean the damage area before you start using the windshield repair kit.
Every windshield repair kit has a suction cup tool and you need to position this tool where the damaged area is. The center of the suction cup tool that is threaded should be directly over the stone chip area of the windshield. Push the suction cups to secure the four arms in the proper place.
Once the suction cup tool is positioned firmly in place, you can now twist the repair tube into the center of the tool. Screw the repair tube tightly using only your hand and you do not have to use any tools to screw in the repair tube.
The success of repairing your windshield is relative to the correct alignment of the tool to the stone chip area. Double checking the position of the threaded repair tube is vitally necessary and you can do the checking by looking from the inside of your car. The rubberized end of the repair tube should be positioned directly over the stone chip of the windshield.
Open the tube that contains the resin and squeeze it into the repair tube. The amount of resin needed for the repair should not be too much or too little. Two to four drops of resin into the repair tube is quite enough. Locate the plunger in the windshield repair kit and insert it immediately into the repair tube then tighten it by pushing it down. The pressure from the plunger will push the resin into the stone chip area. Tighten and retighten the plunger to let the air bubbles escape from the resin.
Give the repair resin about one or two minutes to really penetrate into the stone chip then completely remove from the windshield the suction cup tool. Take the clear finishing film from the windshield repair kit and immediately place a portion of the film over the repair area. Press the resin carefully going to the film’s edges using a razor blade. The purpose of doing this is to evenly spread the resin and make it as thin as possible under the clear film. You can put a little adhesive tape to ensure that the clear film won’t move and mess up your repair work.
Let the resin get dry completely under the clear film for about ten minutes or more before taking out the clear film from the windshield. If there are some excess resin on the windshield, you can remove it by using the razor blade. You know that you have done a perfect repair job on your windshield when you can’t see any traces of the stone chip anymore.


